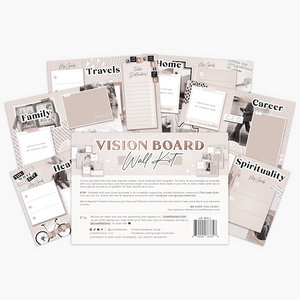
In our What is a Vision Board and Why Does It Work blog post, we went over the basics and how vision boards are tools you create to manifest goals no matter what area of your life it may be for: relationships, family, friends, career, vacation, etc. What it does is helps you concentrate and focus on what you want to accomplish with a life goal you have.
The key to a great vision board though is to create it in a way that’s aesthetically pleasing to you and covers all the points that you’re hoping to reach with continued visualization for the Law of Attraction; “the belief that positive or negative thoughts bring positive or negative experiences into a person's life.”
In this blog post, we’ve rounded up five steps for making a vision board that works for how you need it to work.
Step 1: Decide on a vision board topic or point of focus.
Vision boards can truly be created any way you wish, but you’ll get the most out of it if you are specific about the intentions you put onto your vision board. For example, “lifestyle” is a good vision board topic however it might be too broad. Ask yourself breakdown questions like what specifically about my lifestyle am I looking to transform? This step is defining for your vision board and the goals you’re looking to achieve!
Step 2: Source inspiration.
The Vision Board Planner is packed with powerful and inspirational graphics and quotes for you to use to complete your vision boards. You can customize your vision boards further with magazines, books, etc. Magazines are a great source of inspiration because there are so many different types of publications that are specific to certain interests. You can even use magazine clippings for your vision board assembly!
Step 3: Arrange pieces before you adhere them to your vision board.
When you’re in creative mode, things are bound to change. Imagine sitting in front of your Vision Board Planner. You have different cutouts, magazine clippings, and personal images you want to assemble on your vision board. You’re excited and you glue all the pieces down but a’ha! Would you look at that? You forgot a very important photo for your vision board and now it won’t fit right because everything is glued down! Avoid glueing until the last possible opportunity.
Step 4: Create with the intent to display.
Vision boards only work when you look at them on the daily. That’s part of the manifestation and Law of Attraction process. So when you’re creating your vision board, if it’s something that’s not going to live in your Vision Board Planner, you want to keep in mind your home aesthetic so that it’s not a debate whether or not your vision board is a displayable piece.
Step 5: Include a combination of words and images.
Your vision board will have more power when the message comes through loud and clear, which is why we recommend using a combination of words and images. By doing that, you’ll get a vision board that speaks to you both metaphorically and literally. And cool thing to know: The Vision Board Planner has a bunch of word cutouts. Heaps and heaps!
Follow along and make sure you check out the Vision Board Planner to pair with your learning and manifestation experience with Lovet Planners!
If you have any questions, don’t be afraid to reach out to us! We’re here to help. For more tips, make sure you’re signed up for our newsletter at lovetplanners.com and check out our other pro-tips and planner walkthroughs at the blog section of our site! Questions or comments? Drop a line below!


![Manifestation Memo Pad [DAILY]](http://lovetplanners.com/cdn/shop/files/Manifestingjournalplanner.png?v=1704323635&width=300)


